
How To Use Tattoo Transfer Paper?
Everyone wants a flawless tattoo design, but creating perfect artwork is no simple task. Transforming your imagination into an ideal design is one of the most challenging tasks. At the same time, people struggle to convey their ideas to tattoo artists, like what they want in the form of a tattoo. On the other hand, if you’ve finalized your design, the next problem is how to get it perfectly on your skin.
While a professional tattoo artist can create sketches of your desired design, you can use that pattern to draw on your skin. However, there are still challenges, such as achieving the perfect ink design transfer onto the skin. It can be challenging for a artist to execute a design flawlessly directly on the skin. This is where tattoo transfer paper comes into play. Transfer paper serves as a temporary tattoo stencil. And it allows you to create outlines and subsequently draw actual designs on the skin by tracing its pattern.
However, many beginners must be aware of the proper usage of ink transfer paper. Therefore, this article provides a step-by-step explanation of how to use tattoo transfer paper.
What is Tattoo Transfer Paper?
Tattoo transfer paper is a specialized paper used to transfer a design stencil from paper onto the skin. It typically contains a layer of wax or carbon that facilitates the image transfer process. Available in various colors and sizes, this paper offers artists the flexibility to create any tattoo design.
Types of Transfer Papers:
There are two main types of tattoo transfer paper:
- Thermal Paper: This paper is coated with a special dye or ink that changes color when exposed to heat from a thermal printer. The process is similar to how fax machines and some labels work.
- Hectograph Paper: Also known as freehand transfer paper, this type is commonly used in tattoo artistry. It consists of three sheets, similar to carbon copy sheets. The design is drawn on the top sheet, transferred to the bottom sheet after removing the middle sheet, and then used to transfer the design onto the skin. Moistening the paper and prepping the skin with a stencil stay solution (optional for thermal paper only) helps ensure stability and precision during transfer.
How To Use Tattoo Transfer Paper Using Thermal Paper
Materials Needed:
- Tattoo transfer paper (Thermal Paper)
- Tattoo design or stencil
- Skin-safe pen or marker
- Skin-prep solution (optional)
- Moisturizer (optional)
Step 1: Prepare Your Design: To transfer your tattoo onto the skin using tattoo transfer paper, you must first have a design you want to use. You can draw the design or find one you like online or in a tattoo art book. The design must be printed on thermal paper, a type used with thermal printers.
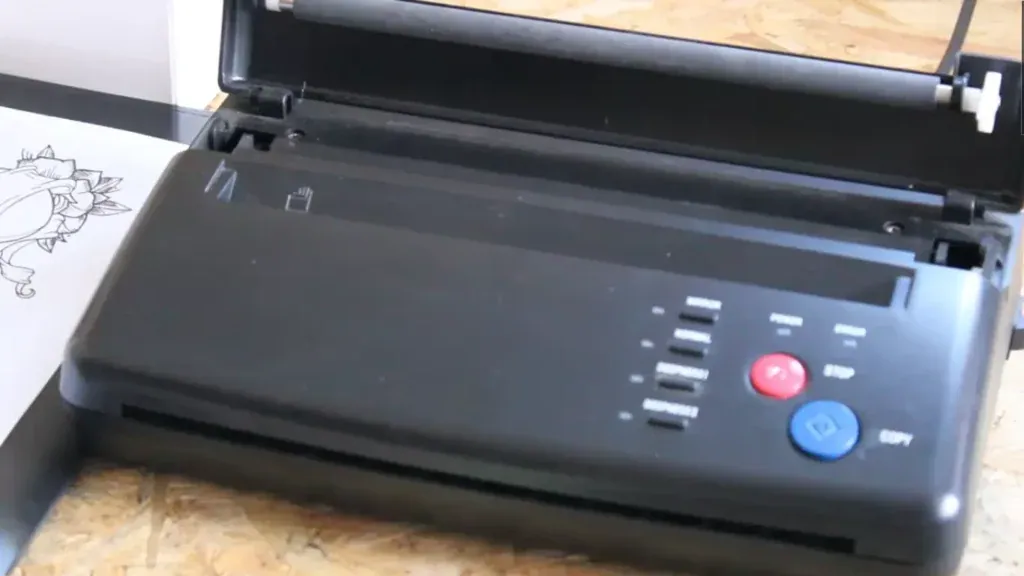
Step 2: Gather Supplies: In addition to your design and thermal paper, you will need a thermal printer, transfer paper, a transfer pen, and rubbing alcohol. You can purchase these supplies at an arts and crafts store or online.
Step 3: Load The Thermal Printer: Before printing your design, you must load the thermal paper into the printer. Before loading it, ensure the printer settings are set to the correct paper type and the design is facing the right way. The printer will heat the paper, causing the structure to appear on the front.
Step 4: Print The Design: Once the thermal paper is loaded, you can print your design. When the design is printed, let the paper cool down before handling it.
Step 5: Prepare The Skin: Before applying the transfer paper, you need to prepare the skin. For this, clean the application area where you will be tattooing with rubbing alcohol to remove any dirt and oils from skin. This will help the transfer paper adhere to the skin better.
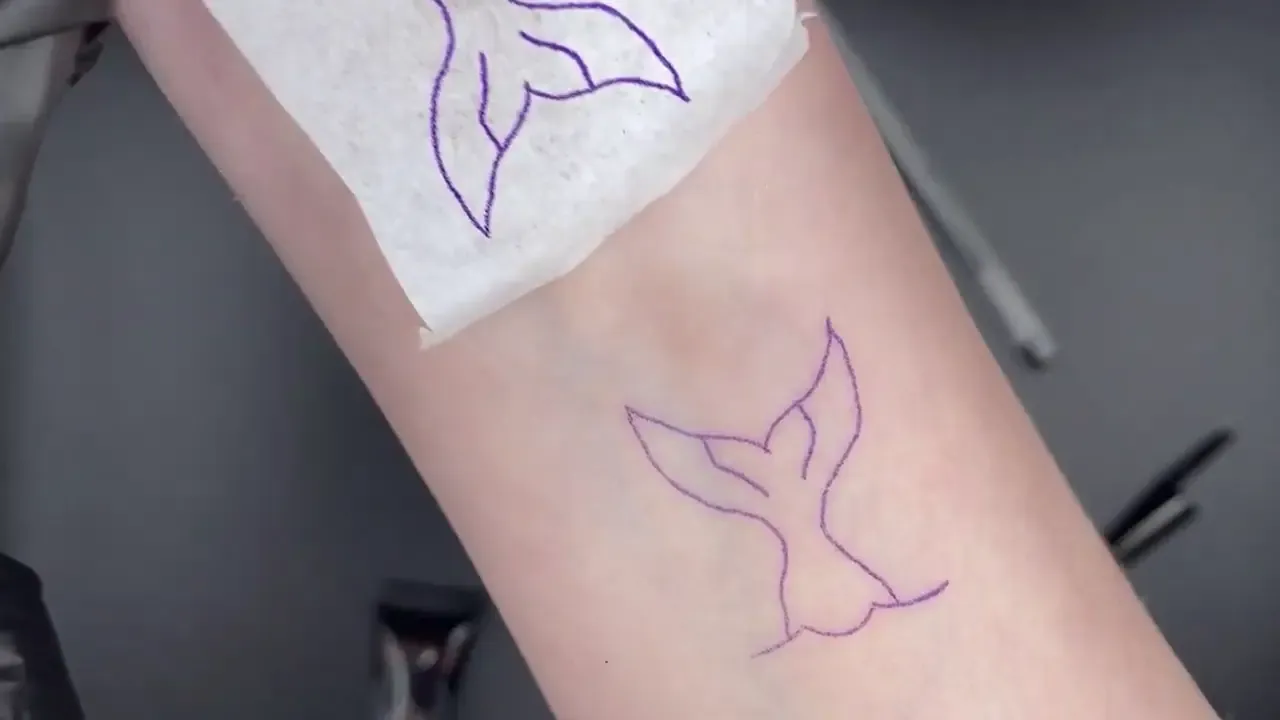
Step 6: Apply The Transfer: Using a transfer pen, trace over the design on the thermal paper. But make sure you trace over every line and detail of the design. After you have outlined the design, apply the transfer paper to the skin. Now, press down firmly and smooth out any wrinkles or bubbles.
Step 7: Transfer The Design: After applying the transfer paper, carefully peel it off, leaving the design on the skin. And make sure that the design is transferred entirely and without any smudging.
Step 8: Peel Off The Transfer Paper: Once the design is transferred onto the skin, you can now peel off the transfer paper. However, do this gently and slowly to avoid damaging the structure.
Step 9: Trace And Tattoo: Before tattooing, try to retrace the design with the transfer pen to ensure the outline is clear and fine. Then, begin the tattooing process, following the design on the skin.
Step 10: Clean And Finish: After the tattoo is complete, clean the area with rubbing alcohol to remove any tattoo ink residue. Then apply a thin layer of aftercare ointment and cover the ink design with a bandage like a second skin or wrap to protect the tattoo. Furthermore, follow your tattoo artist’s proper aftercare instructions to ensure proper healing.
How To Apply Tattoo Transfer Paper Using Hectograph Paper
This process is very similar to the previous one.
Step 1: Select Your Tattoo Design: Start by having a clear and well-defined tattoo design that you want to transfer onto the skin.
Step 2: Gather Materials: Before starting the tattoo transfer process, ensure you have all the necessary materials. This includes the tattoo design, transfer paper, hectograph paper, deodorant or transfer gel, and a tattoo machine.
Step 2: Clean The Skin: Clean the area where you wish to apply the tattoo thoroughly with soapy water and dry it with a clean towel.
Step 3: Trim The Hectograph Paper: Cut the hectograph paper to the size of the selected tattoo design. You can use scissors or a trimmer to achieve the desired size.
Step 4: Prepare The Design On Hectograph Paper:
Place the tattoo design face down on the hectograph paper. Use a pen or pencil to trace the design onto the back of the paper. Be sure to apply adequate pressure to ensure the design is distinctly visible.
Step 5: Trace The Design: Carefully trace the design with a ballpoint pen or sharp pointed instrument such as a stylus or pencil. This will leave an impression of the design on the hectograph paper.
Step 6: Apply Deodorant Or Transfer Gel (Optional): Apply deodorant or transfer gel to the area where you will apply the tattoo. This helps the transfer paper adhere better to the skin, making the tattoo transfer process more efficient.
Step 7: Position The Hectograph Paper On The Skin: Place the hectograph paper on the area where you want the tattoo to appear. But make sure that the impression is facing downwards towards the skin. Secure the paper firmly in place with tape or any other adhesive.
Step 8: Transfer The Design: Use a wet cloth to wet the back of the hectograph paper. Gently press the paper onto the skin and rub the surface of the paper to ensure that the impression is fully transferred. However, be careful not to move the paper while rubbing.
Step 9: Peel Off The Hectograph Paper: Once the transfer is complete, carefully peel off the hectograph paper from the skin. And check that the design has been fully transferred onto the skin before proceeding to the next step.
Step 10: Begin Tattooing: Carefully trace the design onto the skin using a tattoo machine and sterile needles. Be sure to follow the design lines accurately and use the appropriate pressure. Once you have completed the tattoo, clean the area with a damp cloth and apply a thin layer of petroleum jelly to aid in the healing process.
Conclusion:
Creating a perfect tattoo design is challenging; some people need help to convey their ideas to artists. At the same time, tattoo transfer paper is a tool that allows for transferring a design from a stencil onto the skin. And when it comes to types of transfer paper, there are two types: thermal and hectograph.
To use tattoo transfer paper, you must prepare your design, gather supplies, load the printer, print the design, prepare the skin, and apply for the transfer. After this, transfer the design, peel off the transfer paper, trace the tattoo, clean, and finish.
FAQs
How do you transfer a tattoo from paper to skin?
Before the ink can be permanently inked on one’s skin, the tattoo design must be transferred from paper to skin to get accurate results. The process is delicate, requiring extra hands to get it perfectly suitable.
Print the design on a special transfer paper to transfer a tattoo from paper to skin. Then, place the transfer paper on the desired skin area and apply pressure with a moist cloth.
Can you use a pen on tattoo transfer paper?
The short answer is yes, you can use a pen on tattoo transfer paper. Using a pen is one of the easiest and most effective ways to transfer your design onto your skin.
Can you use Vaseline to transfer the tattoo stencil?
One standard method to transfer a tattoo stencil is by using Vaseline. This petroleum jelly acts as a lubricant to help transfer the design from paper onto your skin. Apply a thin layer of Vaseline onto the skin, place the design on top, and press firmly. Once complete, you can remove excess Vaseline, and the stencil will be securely in place.
How long does a tattoo stencil last?
While stencils make the tattooing process much easier, they are not permanent. Most tattoo stencils only last a few days to a few weeks before starting to fade.

Evelyn Grace
Evelyn Grace ✍️ Tattoo artist & writer @ Tattoogaze.com. Specializes in black & grey tattoos. Creates timeless designs with clients to craft meaningful pieces. Ask me anything!
Evelyn Grace
Evelyn Grace ✍️ Tattoo artist & writer @ Tattoogaze.com. Specializes in black & grey tattoos. Creates timeless designs with clients to craft meaningful pieces. Ask me anything!